If you want to try Veo without paying from the first step, Videoinu is a practical place to start. New users get free credits to test the workflow, and Veo is available inside Videoinu’s regular video creation tools. On Videoinu, Veo is positioned around clean, realistic, professional-looking video output, which makes it a strong choice when you want polished visuals rather than playful or exaggerated effects.
Veo also fits naturally into projects where clarity matters. Google DeepMind describes Veo as a model with stronger realism, better prompt following, and more creative control, while Videoinu frames Veo 3.1 as especially useful for commercial, business, and presentation-style content.

What Veo Is Good For
Veo works well when you want video that feels clean, realistic, and well-structured. On Videoinu, Veo is described as a model for polished visuals, consistent motion, and professional content. DeepMind also presents Veo as a model built for greater realism, fidelity, prompt adherence, and creative control.
That makes Veo a good fit for:
- product or marketing videos
- presentation-style clips
- realistic explainer scenes
- professional social content
- projects where the result should look stable and brand-safe
It can also work well for creators building a faceless video workflow for YouTube or social content, especially when the goal is to produce clean videos without filming on camera. Videoinu’s broader platform description includes AI video generation from text or scripts and creator-friendly workflows that support that kind of production.
How to Use Veo on Videoinu
Step 1: Sign Up and Start with Free Credits
Begin by creating a Videoinu account. Once you are inside, you can open the regular video tools and start testing Veo. Videoinu provides free credits for new users, which makes it easy to try the model before deciding whether to go further.
Step 2: Open a Video Tool and Choose Veo
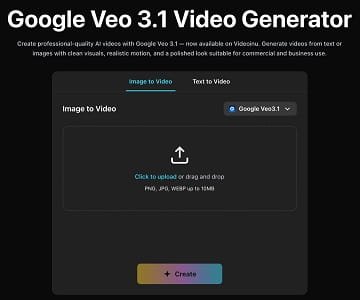
After signing in, open one of Videoinu’s creation tools and choose Veo as the model. Videoinu’s Veo page makes it clear that Veo supports both text and image input, so you can either start from a prompt or use a still image as your starting point.
If you only have an idea in your head, text is usually the easiest way to begin. If you already know how the scene should look, starting from an image can give you more control over the final result. Videoinu supports both an image-based generator and a text-based generator in the same broader workflow.
Step 3: Write a Clear, Structured Prompt
Veo tends to work best when the description is clear and structured. Videoinu’s Veo guide recommends focusing on structure and clarity, while DeepMind’s prompt guide suggests describing framing, motion, style, and action in enough detail to control the scene.
For example:
A woman walks through a quiet office lobby at sunrise, clean modern interior, soft natural light, steady camera movement, professional tone.
This kind of prompt works well because it gives Veo a subject, setting, motion style, and overall mood without becoming messy.
Step 4: Focus on Clarity and Composition
This is the step that matters most with Veo. Instead of pushing for something extreme, it usually helps to make the scene easier to read. Videoinu’s Veo guidance specifically says Veo performs best with clear and structured descriptions, and DeepMind’s prompt advice also emphasizes framing, motion, style, and action as key prompt elements.
That means it helps to think about:
- what the subject is doing
- how the camera should move
- whether the scene should feel calm, polished, or cinematic
- how clean the composition should look
This is one reason Veo is often a better fit for professional or commercial-looking clips than for chaotic effect-heavy ideas. That is an inference based on how both Videoinu and DeepMind describe the model.
Step 5: Generate, Review, and Improve
After that, generate the video and review the first result. Videoinu’s Veo workflow is simple: choose image or text input, refine for structure and clarity, then generate and download the result.
Treat the first version as a draft. Watch it and check whether:
- the scene looks clean
- the motion feels stable
- the output matches the professional tone you wanted
- the composition is easy to follow
If the result is close but not right, improve one thing at a time. Tighten the subject. Simplify the action. Clarify the structure.
Why Videoinu Is a Good Place to Try Veo
One reason is simplicity. Videoinu makes Veo available through the same general creation flow as its other video models, so you do not need to learn a separate process just to test it. Another reason is flexibility: you can start with a single Veo clip, then move into broader content workflows on the same platform if the project grows.
That is especially useful if you are building a faceless content pipeline. A clean Veo clip can be the first step, while the broader Videoinu workflow can support turning scripts into full videos, keeping scenes more consistent, and working in repeatable formats.
Tips for Better Veo Results
Start with one clear scene. Veo is stronger when the prompt is easy to understand and visually structured. Both Videoinu and DeepMind emphasize clarity and composition for better results.
Use text when the idea is still forming. A text prompt is often the fastest way to test whether the mood and structure feel right before investing more effort. Videoinu’s text-based generator is built for exactly that kind of use.
Use an image when the look already matters. If you already have a strong visual reference, starting from an image can make the result easier to control. Videoinu’s Veo tool supports image input directly.
Keep the tone polished. Veo is often at its best when the scene is clean, readable, and professionally framed rather than chaotic or overloaded. That is an inference supported by both sources.
Final Thoughts
The easiest way to get started with Veo on Videoinu for free is to sign up, choose Veo inside a video tool, and begin with a clear prompt or image. If your goal is clean, realistic, professional-looking AI video, Veo is one of the strongest models to explore, and Videoinu gives you a simple way to test it inside a broader creator workflow.
FAQs
Can I try Veo on Videoinu for free?
Yes. Videoinu provides free credits for new users, which can be used to test the creation workflow and try models like Veo.
What is Veo best for?
Veo is a strong fit for clean, realistic, well-structured videos. Videoinu highlights polished and professional output, while DeepMind emphasizes realism, prompt adherence, and creative control.
Can I use text or image input?
Yes. Videoinu’s Veo workflow supports both text and image input, and its tool flow is built around choosing one of those starting points.
Is Veo good for faceless video creation?
It can be. Veo’s clean and realistic output makes it a good fit for faceless content where structure and clarity matter, and Videoinu’s broader workflow supports script-to-video creation.
How should I prompt Veo?
Structured prompts usually work best. Both Videoinu and DeepMind recommend focusing on clear composition, motion, action, and overall scene clarity.
Santosh Kumar is a Professional SEO and Blogger, With the help of this blog he is trying to share top 10 lists, facts, entertainment news from India and all around the world.